Everyone who works in an office where others have access to your files knows the pit in your stomach you feel when you open your prized proposal, presentation, or spreadsheet, only to realize Ted saved his grocery list over it five minutes before the big meeting.
For this installment of Tech Tuesday, we’ll be looking at some simple methods to protect your Microsoft Word files. Many workplaces use Microsoft Office, so that’s what we’ll focus on, but the suggestions still apply to other programs. Only the implementation will be different.
Here are a few different ways to keep Ted from ruining your documents.
Part 1: Backups
Part 2: Mark a Document as Final
Part 3: Password Protect Your Document
Part 4: Save Your Document as a PDF
1) Make Backups, Then Back Those Up Too
Seriously. Almost every kind of computer problem you will ever face can be resolved by having a good backup of your data.
You should have a backup copy of your document that is updated often as you work. That copy should be backed up as well on a less frequent basis. For example, in most workplaces, documents placed on shared network drives are continuously backed up, then also backed up nightly or weekly.
At home, you should have your working copy and a backup copy as well. I’ll be looking at ways to back up your data in an upcoming Tech Tuesday, but as long as you have an extra copy that you keep updated, you always have one you can fall back on when Ted gets click-happy with the Save button. The more important your document is to you, the more copies of it you should keep (within reason).
2) Mark Your Documents as Final
In the newer versions of Office (2010 and on), you can mark a file as final. When you do so, the document becomes read only and users who open it won’t be able to make changes. It’s easy for anyone who’s opened the file to unmark it as final, which then opens it to modifications. This means Mark as Final is a very poor choice for eternal lockdown, but it’s a quick and effective way to keep someone from accidentally destroying your hard work.
To mark a document as final in Word, Excel, or PowerPoint:
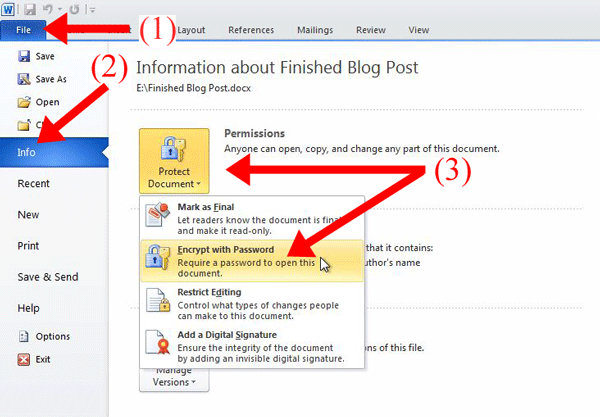
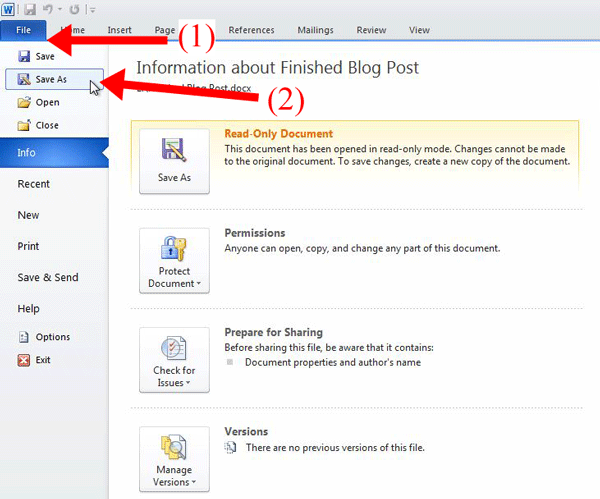
- Click the File tab in the upper left of the ribbon (Fig. 1).
- You should be on the info section of the tab now. If you aren’t, click Info.
- Click Protect Document and select Mark as Final. (You will be given one or two dialog boxes.)
- Read and click OK to proceed.

That’s it! Your document is now marked as final and will open in Read-Only mode. To change it back to normal mode, simply go through the above process again – clicking Mark as Final a second time will remove the setting.
3) Password Protect Your Document
Adding a password to your document increases its security by making it far harder for someone to write over its contents. The tradeoff is that it can also make your document harder for legitimate readers to open. You have to decide how much security you want and balance it with the inconvenience you and others will experience.
It’s very important that you proceed carefully when password protecting your documents. If you forget the password or make a mistake, you can lock yourself out of your own document. As long as you’ve followed Suggestion 1 above and kept a backup, you can recover if you do have a problem or forget the password.
Lock it Down
The most secure option is to completely lock down your document. The file will require a password to open. No one will be able to read it without that password. This option is great for highly sensitive or personal data that no one else needs to see. If anyone else needs to access this document, you should consider the next option.
To lock your Word document with a password:
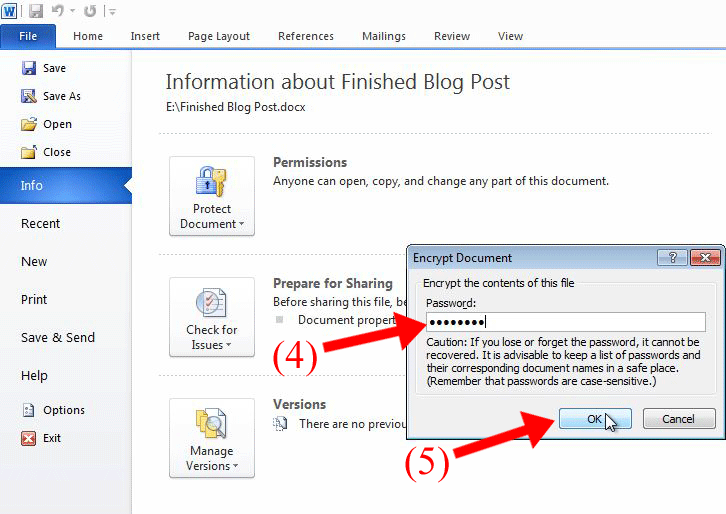
- Click the File tab in the upper left of the ribbon (Fig. 2).
- You should be on the info section of the tab now. If you aren’t, click Info.
- Click Protect Document and select Encrypt with Password.
- The password dialog box will open. Enter a password. (Don’t use “password,” “12345,” or “qwerty.”) (Fig. 3)
- Press OK, then re-enter the password and press OK.
Your document is now encrypted and requires a password to open.
Look, but Don’t Touch
You can also password protect your document so anyone can open it, but only someone who knows the password can make changes. This is a great option for a document that needs to be viewed by many people with only a few making changes. For example: a training manual that all the tellers at a bank can access, but only the training department has the ability to change.
To restrict editing on your Word document while still allowing viewing:
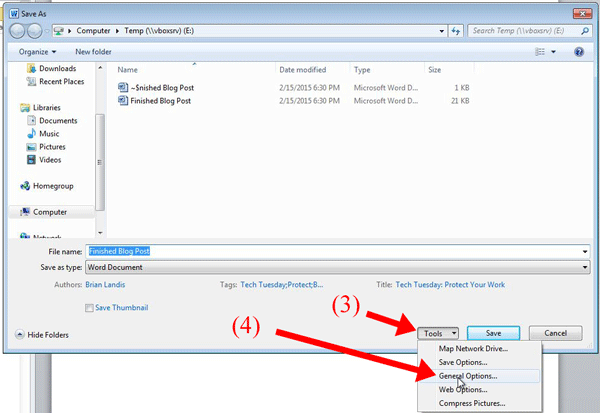
- Click the File tab in the upper left of the ribbon (Fig. 4).
- Click Save As. In Office 2010, the Save As dialog box will open. In Office 2013, you have to select a folder and then the Save As dialog box will open.
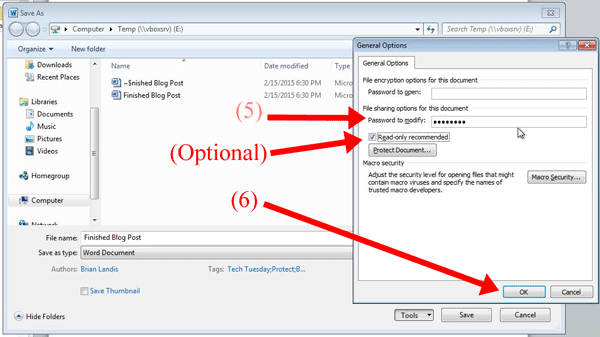
- Click the Tools button just to the left of the save button near the bottom (Fig. 5).
- Select General Options.
- Enter a password in the Password to Modify. Make sure to leave the Password to Open field blank. You can also tick the box labeled Recommend Read Only (Fig. 6).
- Click OK, then re-enter the password in the box that pops up, and click OK.

Your document can now be easily viewed by others, but will require a password to modify.
4) Save a Copy as a PDF
The fourth (and my favorite) way to protect your work is to save it as a PDF. This works great for Word and Excel files, but may not be the right solution for PowerPoint presentations (particularly if they have transitions and animations in them.) PDF files are opened by another application (often Adobe Reader), and generally can’t be modified by the person opening them. They will display the same regardless of the program opening them, which isn’t always true with MS Office files opened in other programs.
To save your Microsoft Office file as a PDF:
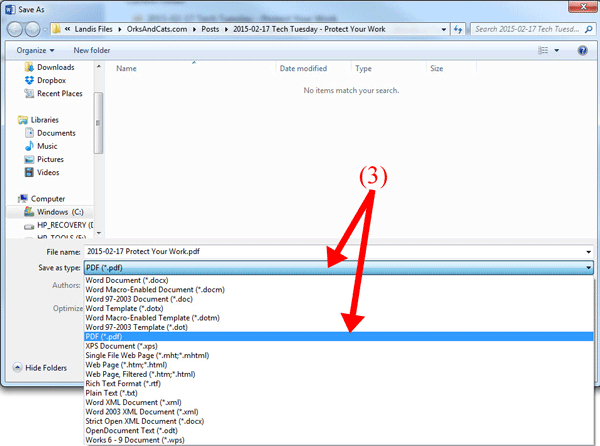
- Click the File tab in the upper left of the ribbon (Fig. 7).
- Click Save As. In Office 2010, the Save As dialog box will open. In Office 2013, you have to select a folder and then the Save As dialog box will open.
- Click the drop-down box next to Save as type: and select PDF (*.pdf) from the list (Fig. 8).
- Click Save.
You’re done! Your new PDF may open automatically for you to review. You can provide that PDF to your colleagues safely, knowing they cannot change the formatting or content. Save your original Office file in a safe location so you can make changes as needed, then simply re-save as outlined above and re-distribute the PDF.
I hope you found these methods useful for keeping your work safe! I’ll be tackling Microsoft Excel in a future post, because even MORE ways to keep your work safe are unique to that program.
If you found this information useful or have any suggestions, please let me know in the comments or by emailing me at brian at orks and cats dot com!
Kc Kathy Cerney liked this on Facebook.